

Keboola Model Context Protocol (MCP) Server
Connect your MCP clients and AI assistants to your Keboola Project and give them the powers of a Keboola Expert user:
- Cursor - Direct deeplink installation
- Claude - Organization-level integration
- ChatGPT - Custom connector for Plus/Pro users
- Windsurf - Plugin store or manual configuration
- VS Code - Agent mode with MCP servers
- Make - Agent mode with MCP servers
- Other clients - Remote server connection
Query data, create transformations, write SQL queries, and build your pipelines — all with no clicks required.
Keboola’s MCP Server brings powerful AI agents like Claude and Cursor directly into your data workflows. Just describe what you need in plain language to:
- Search and explore your data.
- Set up and manage workflows — no code required.
- Build SQL queries and transformations using AI.
- Launch and monitor jobs in real time.
- Automatically document everything — down to the column level.
Business Use Cases
Section titled “Business Use Cases”- Analyze customer orders, segment users, or monitor campaign performance — just by describing what you need, your assistant will query the data in your project directly.
- Instantly get data from any system (CRM, ERP, ads) without touching the UI.
- Update and run data pipelines before key meetings — no technical help required.
- Automatically generate clear, human-readable descriptions down to the column level for full data transparency.
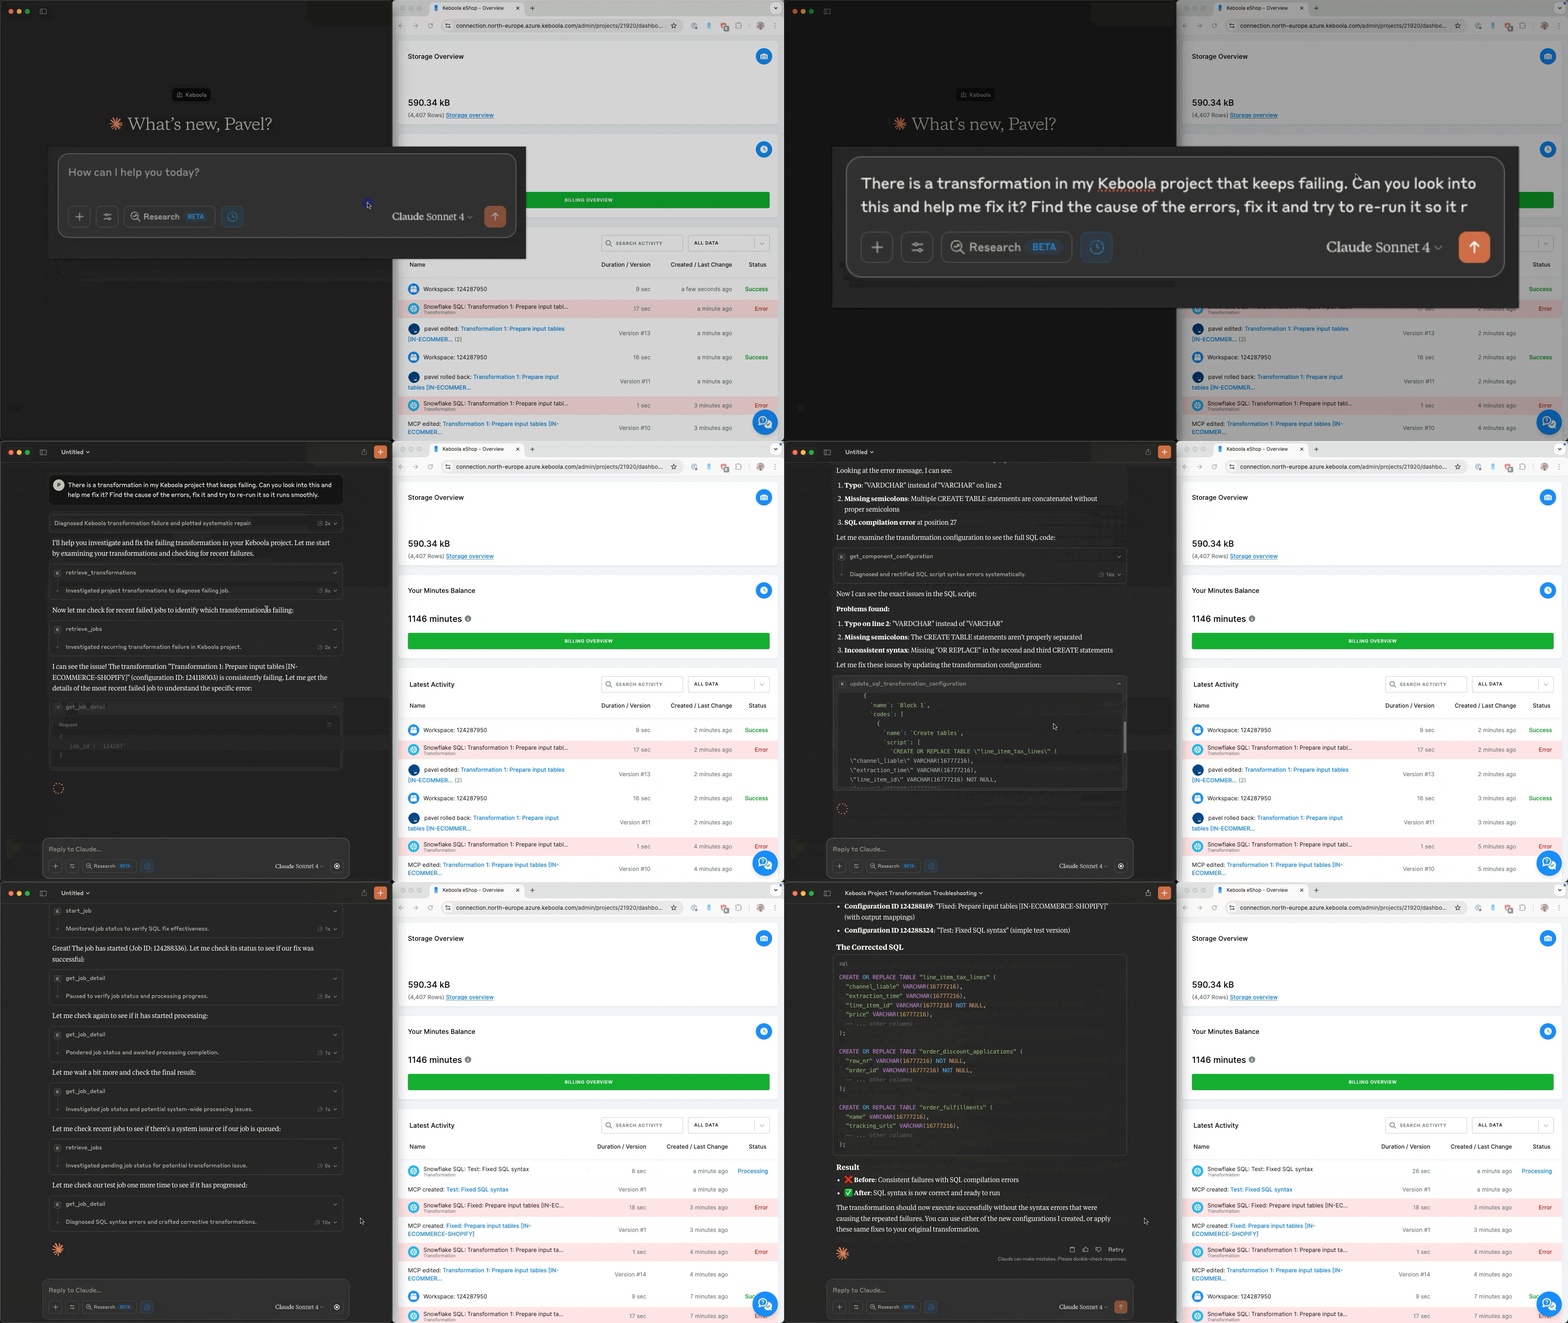
Connecting to Keboola’s MCP Server
Section titled “Connecting to Keboola’s MCP Server”Keboola MCP Server is hosted on every multi-tenant stack and supports OAuth authentication. You can use the remote server in any AI Assistant that supports remote Streamable HTTP connection and OAuth authentication. Streamable HTTP is the recommended transport method, providing bidirectional streaming for improved performance compared to the deprecated SSE transport.
Remote Server Setup
Section titled “Remote Server Setup”In case your AI assistant supports remote connection, you can connect to Keboola’s MCP Server by following these steps:
- Obtain the remote server URL of the stack
https://mcp.<YOUR_REGION>.keboola.com/mcp.- Available stack URLs:
https://mcp.keboola.com/mcphttps://mcp.us-east4.gcp.keboola.com/mcphttps://mcp.eu-central-1.keboola.com/mcphttps://mcp.north-europe.azure.keboola.com/mcphttps://mcp.europe-west3.gcp.keboola.com/mcp
- You can find the url in your Keboola Project Settings under the tab
MCP Server- In there you can also find specific instructions for various clients.
- Available stack URLs:
- Copy the server URL and paste it into your AI assistant’s settings.
- Once you save the settings and refresh your AI assistant, you will be prompted to authenticate with your Keboola account and select the project you want to connect to.
Using with Claude Desktop
Section titled “Using with Claude Desktop”- Go to Settings > Integrations
- Click the “Add more” button
- Give the integration a name (Keboola) and paste in your Integration URL
https://mcp.<YOUR_REGION>.keboola.com/mcp
- Click “Add”
- You’ll be prompted to authenticate with your Keboola account and select the project you want to connect to.
Via mcp-remote adapter
Section titled “Via mcp-remote adapter”If you don’t have a paid version you can still use the mcp-remote adapter to connect Claude Desktop to Keboola’s MCP Server.
NOTE: This method requires you to have Node.js installed on your computer.
- Open the Claude menu on your computer and select “Settings…”
- Click on “Developer” in the left-hand bar of the Settings pane, and then click on “Edit Config”
- Paste the following JSON into the config file and save.
{ "mcpServers": { "keboola": { "command": "npx", "args": [ "mcp-remote", "https://mcp.<YOUR_REGION>.keboola.com/mcp" ] } }}- Restart Claude Desktop, you’ll be prompted to authenticate with your Keboola account and select the project you want to connect to.
Using with ChatGPT
Section titled “Using with ChatGPT”ChatGPT Plus and Pro users can connect to Keboola’s MCP Server using custom connectors. Follow these steps to set up the integration:
Step 1: Access ChatGPT Settings
Section titled “Step 1: Access ChatGPT Settings”- Log in to your ChatGPT Plus or Pro account
- Click on your profile icon in the bottom-left corner of the screen
- From the menu that appears, select Settings
Step 2: Navigate to Connectors
Section titled “Step 2: Navigate to Connectors”- In the settings window, select the Connectors tab from the left-hand sidebar
- Look for the “Developer mode” option and toggle it on
- Read and acknowledge the warning that appears - this mode allows you to create custom connectors
- In the top-right corner of the Connectors page, click Create
Step 3: Configure the New Connector
Section titled “Step 3: Configure the New Connector”- A new window will open for the “New Connector” settings
- Name: Give your connector a name, such as “Keboola”
- Description: Provide a brief description (optional)
- MCP Server URL: This is the most important part. You need the specific URL for your Keboola MCP Server:
- Open a new tab and go to your Keboola project settings
- Navigate to
Users & Settings>MCP Server - Copy the MCP Server URL provided there (e.g.,
https://mcp.us-east4.gcp.keboola.com/mcp) - Paste this URL into the MCP Server URL field in ChatGPT
- Authentication: The authentication method will be set to OAuth automatically
- Check the box to confirm you understand the “beta” nature of custom connectors
- Click Create
Step 4: Authorize the Connection
Section titled “Step 4: Authorize the Connection”- After clicking “Create,” you will be redirected to the Keboola platform to authorize the connection
- Sign in to your Keboola account if prompted
- Select the specific Keboola project you want to connect to
- Once authorized, you will be redirected back to ChatGPT
- A confirmation message “Keboola is now connected” will appear at the top of the screen
Step 5: Use the Connector in a Chat
Section titled “Step 5: Use the Connector in a Chat”To use the custom connector you’ve created, you must explicitly enable Developer Mode in the chat interface:
- Start a new chat
- Click on the “Add photos & files” icon
- Hover over the “More” option
- From the expanded menu, select “Developer Mode”
- This will change the prompt box to indicate that developer mode is active
- You will see an option to select your custom connector (e.g., a button labeled “Keboola”)
- Click on the “Keboola” button to enable it for this specific conversation
You can now ask questions related to your Keboola data, and ChatGPT will use the connector to access the information. For example: “What data tables are in my project?” or “Show me the latest job runs.”
Using with Cursor
Section titled “Using with Cursor”Click the button related to your region below:
| Stack (Region) | Cursor Deeplink |
|---|---|
| US Virginia AWS (default) |  |
| US Virginia GCP (us-east4) | |
| EU Frankfurt AWS (eu-central-1) | |
| EU Ireland Azure (north-europe) | |
| EU Frankfurt GCP (europe-west3) | |
Alternatively, you can:
- Navigate to Keboola project settings, click
Users & Settings>MCP Server. - Click the Cursor tab.
- Click the “Install In Cursor” button.
- You’ll be prompted to login into your Keboola account and select the project you want to connect to.
Using with Windsurf
Section titled “Using with Windsurf”Windsurf supports MCP through its native integration with Cascade. You can add Keboola’s MCP Server in two ways:
Option 1: Manual Configuration (Recommended)
Section titled “Option 1: Manual Configuration (Recommended)”- Open the Windsurf settings and navigate to
Cascade>Plugins - Click on “Add MCP Plugin” or edit the
mcp_config.jsonfile directly - Add the Keboola MCP Server configuration:
{ "mcpServers": { "keboola": { "serverUrl": "https://mcp.<YOUR_REGION>.keboola.com/mcp" } }}- Replace
<YOUR_REGION>with your specific stack URL from the available stack URLs - Press the refresh button after adding the configuration
- You’ll be prompted to authenticate with your Keboola account and select the project
For detailed instructions and troubleshooting, see the Windsurf MCP documentation.
Using with VS Code
Section titled “Using with VS Code”VS Code supports MCP servers through GitHub Copilot’s agent mode. Follow these steps to set up Keboola’s MCP Server:
Prerequisites
Section titled “Prerequisites”- VS Code with GitHub Copilot extension installed
- GitHub Copilot subscription (Pro, Business, or Enterprise)
Setup Instructions
Section titled “Setup Instructions”- Open VS Code and ensure you have the latest version of the GitHub Copilot extension
- Open the Command Palette (
Ctrl+Shift+P/Cmd+Shift+P) and run “MCP: Configure Servers” - This will create or open your MCP configuration file (
mcp.json) - Add the Keboola MCP Server configuration:
{ "servers": { "keboola": { "command": "npx", "args": [ "mcp-remote", "https://mcp.<YOUR_REGION>.keboola.com/mcp" ] } }}- Replace
<YOUR_REGION>with your specific stack URL from the available stack URLs - Save the configuration file
- Restart VS Code or run “MCP: Restart Servers” from the Command Palette
- You’ll be prompted to authenticate with your Keboola account and select the project
Using MCP Tools in VS Code
Section titled “Using MCP Tools in VS Code”- Open the Chat view and enable agent mode
- Select the Tools button to see available Keboola tools
- Use
#in your chat to reference specific tools or resources - The tools will be available with up to 128 tools per request
For detailed setup and troubleshooting, see the VS Code MCP documentation.
Using with MAKE
Section titled “Using with MAKE”- Create your scenario in MAKE.
- Use the MCP Client component within the scenario.
- In the dropdown of the MCP Client, select Keboola.
- Navigate to Keboola project settings, click
Users & Settings>MCP Server. - Click the MAKE tab.
- Copy the integration URL displayed there into the MCP Client configuration in MAKE.
Available Tools
Section titled “Available Tools”Keboola’s MCP Server comes with a rich set of tools your AI client (like Claude or Cursor) can use to interact with your data environment — just by asking in plain language. Don’t worry about remembering command names — your AI client handles that. Just describe what you want to do.
- Components & Transformations – Create, edit, and launch them with natural language.
- Storage – Browse, edit, and document buckets, tables, and columns.
- SQL – Run and manage SQL queries.
- Jobs – Start, monitor, and debug execution flows.
- Documentation – Search official Keboola docs from within your AI chat.
Restricting Tool Access
Section titled “Restricting Tool Access”When using the remote MCP server, you may want to limit which tools are available to AI agents. This is useful for:
- AI Agent Restrictions: Limiting what actions an AI agent (like Devin or Cursor) can perform in your project
- Compliance and Security: Enforcing data governance policies by restricting write operations
- Customer-Specific Access: Creating tailored access profiles for different use cases
When connecting via the Streamable HTTP transport, you control which tools are available to clients using HTTP headers.
Authorization Headers
Section titled “Authorization Headers”The following HTTP headers control tool access:
| Header | Description | Example Value |
|---|---|---|
X-Allowed-Tools | Comma-separated list of tool names to allow. Only these tools will be available. | get_configs,get_buckets,query_data |
X-Disallowed-Tools | Comma-separated list of tool names to exclude. These tools will be removed from the available set. | create_config,run_job |
X-Read-Only-Mode | When set to true, 1, or yes, restricts access to read-only tools only. | true |
These headers are set by the client (e.g., your AI agent integration or custom MCP client) when making HTTP requests to the MCP server. Refer to your MCP client’s documentation for how to configure custom HTTP headers.
Filter Behavior
Section titled “Filter Behavior”When multiple headers are present, filters are applied in the following order:
- Allowed tools filter: If
X-Allowed-Toolsis specified, only those tools are initially available. - Read-only intersection: If
X-Read-Only-Modeis enabled, the available tools are intersected with the read-only tools set. - Disallowed exclusion: Tools listed in
X-Disallowed-Toolsare removed from the final set.
Empty headers are treated as no restriction/exclusion (backward compatible behavior).
Read-Only Tools
Section titled “Read-Only Tools”The following tools are classified as read-only (they do not modify data). The live set may grow over time — see TOOLS.md in the server repo for the current annotations:
| Category | Tools |
|---|---|
| Components | get_configs, get_components, get_config_examples |
| Flows | get_flows, get_flow_examples, get_flow_schema |
| Storage | get_buckets, get_tables |
| SQL | query_data |
| Data Apps | get_data_apps |
| Jobs | get_jobs |
| Search | search, find_component_id |
| Project | get_project_info |
| Documentation | docs_query |
Examples
Section titled “Examples”AI Agent Restrictions: When integrating AI agents (like Devin, Cursor, or custom agents) with your Keboola project, you may want to limit their capabilities. For example, allowing an agent to query and explore data but preventing it from creating or modifying configurations:
X-Read-Only-Mode: trueCompliance and Security: For environments with strict data governance requirements, you can create customer-specific access profiles. For example, allowing only specific tools while explicitly blocking others:
X-Allowed-Tools: get_buckets,get_tables,query_data,searchX-Disallowed-Tools: run_jobCombined Restrictions: You can combine all three headers for fine-grained control. For example, to allow only a subset of read-only tools:
X-Allowed-Tools: get_configs,get_buckets,get_tables,query_data,create_configX-Read-Only-Mode: trueX-Disallowed-Tools: query_dataThis configuration would result in only get_configs, get_buckets, and get_tables being available (the intersection of allowed and read-only, minus the disallowed).
MCP Server Capabilities
Section titled “MCP Server Capabilities”The Keboola MCP Server supports several core concepts of the Model Context Protocol. Here’s a summary:
| Concept | Supported | Notes |
|---|---|---|
| Transports | ✅ | Supports stdio and Streamable HTTP (recommended) for client communication. |
| Prompts | ✅ | Processes natural language prompts from MCP clients to interact with Keboola. |
| Tools | ✅ | Provides a rich set of tools for storage operations, component management, SQL execution, job control. |
| Resources | ❌ | Exposing Keboola project entities (data, configurations, etc.) as formal MCP Resources is not currently supported. |
| Sampling | ❌ | Advanced sampling techniques are not explicitly supported by the server itself. |
| Roots | ❌ | The concept of ‘Roots’ as defined in general MCP is not a specific feature of the Keboola MCP server. |
Running the MCP Server Locally
Section titled “Running the MCP Server Locally”While MCP clients like Cursor or Claude typically manage the MCP server automatically, you might want to run the Keboola MCP Server locally for development, testing, or when using a custom client. You can run it via Docker or via the uv/uvx command.
Using Docker (recommended)
Section titled “Using Docker (recommended)”For a consistent and isolated environment, running the Keboola MCP Server via Docker is often the recommended approach for local execution, especially if you don’t want to manage Python environments directly or are integrating with clients that can manage Docker containers.
Before proceeding, ensure you have Docker installed on your system. You can find installation guides on the official Docker website.
-
Pull the latest image:
Terminal window docker pull keboola/mcp-server:latest -
Run the Docker container:
-
For Snowflake users:
Terminal window docker run -it --rm \-e KBC_STORAGE_TOKEN="YOUR_KEBOOLA_STORAGE_TOKEN" \-e KBC_WORKSPACE_SCHEMA="YOUR_WORKSPACE_SCHEMA" \keboola/mcp-server:latest \--api-url https://connection.YOUR_REGION.keboola.comReplace
YOUR_KEBOOLA_STORAGE_TOKEN,YOUR_WORKSPACE_SCHEMA, andhttps://connection.YOUR_REGION.keboola.comwith your actual values. -
For BigQuery users (requires volume mount for credentials):
Terminal window # Ensure your Google Cloud credentials JSON file is accessibledocker run -it --rm \-e KBC_STORAGE_TOKEN="YOUR_KEBOOLA_STORAGE_TOKEN" \-e KBC_WORKSPACE_SCHEMA="YOUR_WORKSPACE_SCHEMA" \-e GOOGLE_APPLICATION_CREDENTIALS="/creds/credentials.json" \-v /local/path/to/your/credentials.json:/creds/credentials.json \keboola/mcp-server:latest \--api-url https://connection.YOUR_REGION.keboola.comReplace placeholders and ensure
/local/path/to/your/credentials.jsonpoints to your actual credentials file on your host machine.
The
--rmflag ensures the container is removed when it stops. The server inside Docker will typically listen onstdioby default, which is suitable for clients that can invoke and manage Docker commands. -
Example: Configuring Cursor IDE to use Docker for Keboola MCP Server:
If your MCP client (like Cursor) supports defining a Docker command for an MCP server, the configuration might look like this:
{ "mcpServers": { "keboola": { "command": "docker", "args": [ "run", "-it", "--rm", "-e", "KBC_STORAGE_TOKEN", "-e", "KBC_WORKSPACE_SCHEMA", "keboola/mcp-server:latest", "--api-url", "https://connection.YOUR_REGION.keboola.com" ], "env": { "KBC_STORAGE_TOKEN": "YOUR_KEBOOLA_STORAGE_TOKEN", "KBC_WORKSPACE_SCHEMA": "YOUR_WORKSPACE_SCHEMA" } } }}- Ensure Docker is running on your system.
- Replace placeholders like
YOUR_KEBOOLA_STORAGE_TOKEN,YOUR_WORKSPACE_SCHEMA, and the Keboola API URL. - The client (Cursor) passes the
KBC_STORAGE_TOKENandKBC_WORKSPACE_SCHEMAfrom itsenvblock to thedocker runcommand through the-eflags. The--api-urlis passed directly as an argument to thekeboola/mcp-serverentrypoint.
Using the uv command
Section titled “Using the uv command”The primary way to run the server locally without Docker is by using uv or uvx to execute the keboola_mcp_server package. More information about the server is available in its Keboola MCP Server GitHub repository. Make sure you have Python 3.10+ and uv installed.
-
Set up environment variables:
Before running the server, you need to configure the following environment variables:KBC_STORAGE_TOKEN: Your Keboola Storage API token.KBC_WORKSPACE_SCHEMA: Your Keboola project’s workspace schema (for SQL queries).KBC_STORAGE_API_URL: Your Keboola instance API URL (e.g.,https://connection.keboola.comorhttps://connection.YOUR_REGION.keboola.com).
Refer to the Keboola Tokens and Keboola workspace manipulation for detailed instructions on obtaining these values.
1.1. Additional Setup for BigQuery Users
If your Keboola project uses BigQuery as its backend, you will also need to set up theGOOGLE_APPLICATION_CREDENTIALSenvironment variable. This variable should point to the JSON file containing your Google Cloud service account key that has the necessary permissions to access your BigQuery data.Example:
GOOGLE_APPLICATION_CREDENTIALS="/path/to/your/credentials.json" -
Run the server:
uvx keboola_mcp_server --api-url $KBC_STORAGE_API_URLThe KBC_STORAGE_API_URL was set as an environment variable but can also be provided manually via the --api-url flag. The command starts the server communicating via stdio. To run the server in Streamable HTTP mode (listening on a network host/port such as localhost:8000), pass the appropriate flags to keboola_mcp_server. For day-to-day use with clients like Claude or Cursor you usually do not need to run this command manually, as they handle the server lifecycle.
Connecting a client to a localhost instance
Section titled “Connecting a client to a localhost instance”When you run the Keboola MCP Server manually, it will typically listen on stdio or on a specific HTTP port if configured for Streamable HTTP.
stdio-based clients: Configure the client application to launch the localkeboola_mcp_serverexecutable and communicate over standard input/output.Streamable HTTP-based clients: If you start the server in HTTP mode, your client should connect to the specified host and port (e.g.,http://localhost:8000/mcp?storage_token=XXX&workspace_schema=YYY).
Example: connecting Cursor IDE to a local uvx instance
If you are running the Keboola MCP Server locally using uvx, you can configure Cursor IDE to connect to this local instance. This is useful for development or testing with a custom server build.
- Open Cursor settings
- Navigate to the MCP section within settings
- Add or configure your Keboola project Provide your
KBC_STORAGE_TOKEN,KBC_WORKSPACE_SCHEMAand the API URL.
Example mcp_servers.json snippet:
{ "mcpServers": { "keboola": { "command": "uvx", "args": [ "keboola_mcp_server", "--api-url", "https://connection.YOUR_REGION.keboola.com" ], "env": { "KBC_STORAGE_TOKEN": "your_keboola_storage_token", "KBC_WORKSPACE_SCHEMA": "your_workspace_schema" } } }}You can use this link to get the above configuration template into your Cursor:
Programmatic Integration
Section titled “Programmatic Integration”Beyond ready-made clients, you can integrate the Keboola MCP Server directly into your own code and AI agent frameworks. This unlocks fully automated data workflows driven by natural-language instructions.
Claude Messages API with MCP Connector (Beta)
Section titled “Claude Messages API with MCP Connector (Beta)”Anthropic offers a beta feature, the MCP connector, which enables you to connect to remote MCP servers (such as the Keboola MCP Server) directly through Claude’s Messages API. This method bypasses the need for a separate, standalone MCP client if you are already using the Claude Messages API.
Key features of this integration
Section titled “Key features of this integration”- Direct API Calls: You configure connections to MCP servers by including the
mcp_serversparameter in your API requests to Claude. - Tool Calling: The primary MCP functionality currently supported through this connector is tool usage.
- Accessibility: The target MCP server needs to be publicly accessible over HTTP.
This approach can simplify your architecture if you’re building applications that programmatically interact with Claude and need to leverage MCP-enabled tools without managing an additional client layer.
For complete details, API examples, and configuration options, please consult the official Anthropic MCP connector documentation.
OpenAI Agents SDK (Python)
Section titled “OpenAI Agents SDK (Python)”The OpenAI Agents SDK ships with first-class MCP support. Simply start the Keboola MCP Server (locally via uvx or remotely over Streamable HTTP) and register it with the SDK:
from agents import Agentfrom agents.mcp import MCPServerStdio
async with MCPServerStdio(    params={"command": "uvx", "args": ["keboola_mcp_server"]}) as mcp:    agent = Agent(        name="Assistant",        instructions="Use the Keboola tools to achieve the task",        mcp_servers=[mcp],    )    await agent.run("Load yesterday's CSV into Snowflake")
The SDK automatically calls list_tools() on the server, making every Keboola operation available to the model.
LangChain
Section titled “LangChain”LangChain does not yet include a built-in MCP connector, but you can integrate by:
- Running the Keboola MCP Server, or attaching to our deployed instance
https://mcp.REGION.keboola.com. - Mapping each entry from
list_tools()to aToolin LangChain. - Adding those tools to an
AgentExecutor.
Because the server returns standard JSON schemas, the mapping is straightforward and can be handled with a lightweight wrapper. Native MCP support is already under discussion in the LangChain community.
Other frameworks
Section titled “Other frameworks”- Crew AI – Provide crew members with Keboola tool definitions and route tool invocations through the MCP server.
Building your own MCP client
Section titled “Building your own MCP client”If you are developing your own MCP client or integrating MCP capabilities into a custom application, you can connect to the Keboola MCP Server. The server supports standard MCP communication protocols.
For detailed instructions and SDKs for building your own MCP client, refer to the official Model Context Protocol documentation for client developers. Supported transports (stdio, Streamable HTTP) are listed in MCP Server Capabilities above. For more details on the Keboola MCP server, including how it can be run and configured for custom client integration, refer to its GitHub repository.
Advanced Setup Options
Section titled “Advanced Setup Options”These methods are for developers or specific use cases (e.g., testing, contributing to the MCP server). For CLI control, dev environments, or contributing to the MCP Server, check out the MCP GitHub repo.
Support and Feedback
Section titled “Support and Feedback”Need help or want to contribute? Open an issue on GitHub to report bugs, request features, or suggest improvements. We’d love your ideas, fixes, and feedback to make MCP even better.